
Examples for the scheduler
The following chapter demonstrates how to create day, week and free schedules as well as a reaction program. The examples also shows how to create a special days list which is used when creating these schedules.
 Example 1
The heat and climate control of an office building should be done by the scheduler. The system should work from Monday to Friday from 06:00 to 18:30. On Saturdays and Sundays the system should only be activated form 06:00 to 12:00.
On holidays another control pattern should be activated from 08:00 to 12:00 o'clock.
All on and off events should be verified with pop-up messages on the control station. This example shows how to create a special days list used for the activation of another control pattern during the holidays, how to create a week schedule for the heat and climate control from Monday to Sunday and how to create a day schedule for the holidays using the created special days list.
Step 1 - Create a special days list
-
Start your project.
-
Open the scheduler via System Management > Settings > Scheduler.
-
Open the special days table by pressing the Configure special days button.
-
Press the New special day button
 and type the name Easter in the
Name text field.
and type the name Easter in the
Name text field. -
Choose the date 01. April via the Date Time Picker and press the OK button. You can see the created day in the special day table. Repeat the steps 1 to 4 and create the following days: Good Friday: 28 of March, Christmas Eve: 24 of December, Christmas Day: 25 of December, New Years Eve: 31 of December. Your Special days table should look like the following figure:
Figure 1. Special days table 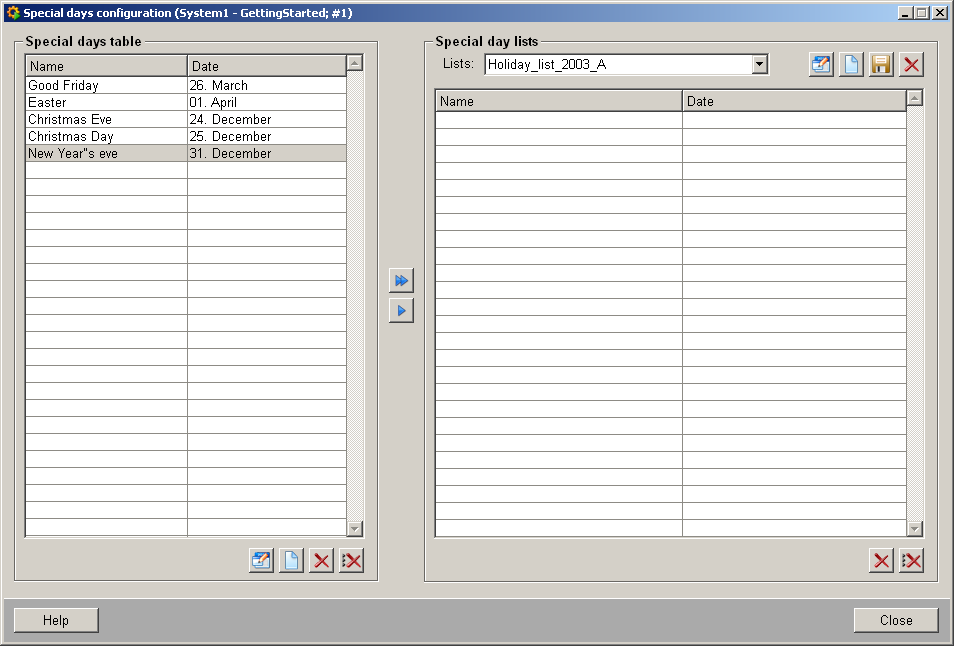
-
Press the New configuration button in the Special day lists table.
-
Type the name Holiday_list_2003_A and press the OK button.
-
Move the created holidays to the Holiday_list_2003_A by pressing the
 button. Your
Holiday_list_2003_A should look like the following figure:
button. Your
Holiday_list_2003_A should look like the following figure:Figure 2. Special day lists -Holiday_list_2003_A 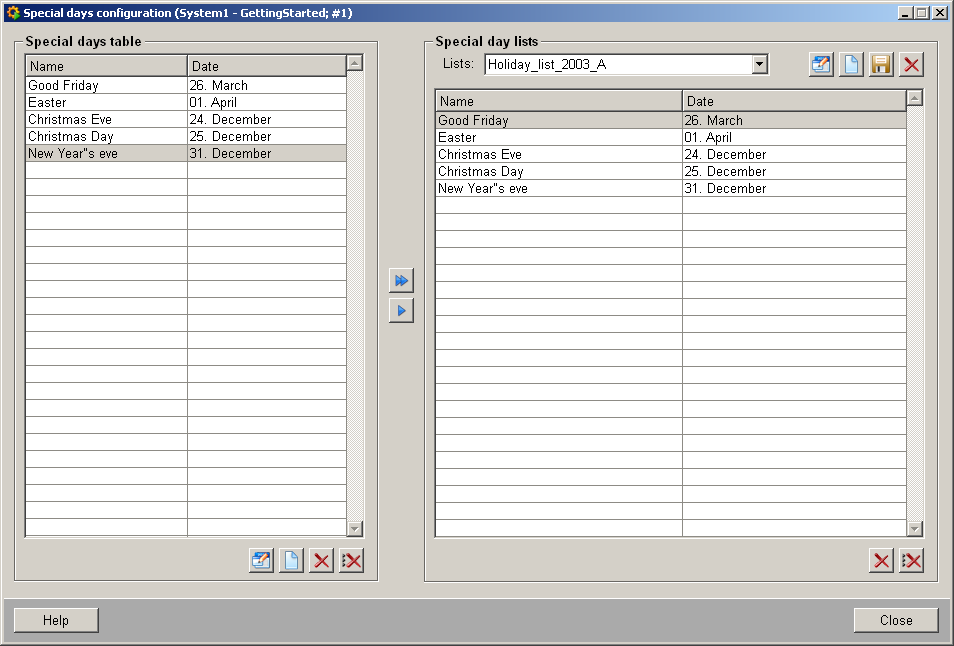
-
Save the created list.
A special day list Holiday_list_2003_A was easily created and can be used when creating schedules.
Step 2 - Create a week schedule
-
Open the weekschedule panel by pressing the New week schedule button.
-
Create a new week schedule (”Normal_week”) with the description "This schedule contains the time pattern for a normal week schedule" and time pattern 06:00 to 18:30 in the first paragraph by defining the name and description via the respective buttons and dragging the time bar 06:00 to 18:30 in the week overview window.
-
Choose the special day list Holiday_list_2003_A with the ”Exclude special days” mode.
-
Enter the second time pattern 06:00 to 12:00 for Saturday and Sunday.
-
Choose a validity period (e.g. 2003.01.01 00:00:00 to 2003.12.31 00:00:00) from the Time condition.
-
Configure a pop-up action for the desired user interface and create the needed DPE list that sets the heat and climate control values by pressing the
 button and
defining the DPE values via Set list of DPE`s and Activate PopUp.
button and
defining the DPE values via Set list of DPE`s and Activate PopUp. -
Activate the schedule.
-
Save the schedule.
Figure 3. Normal week schedule 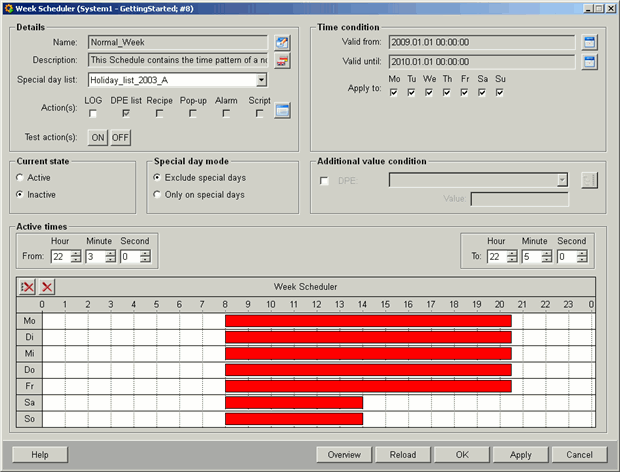
A week schedule was created. The created schedule sets the heat and climate control values from 06:00 to 18:30 o'clock (Monday-Friday) and from 06:00 to 12:00 o'clock (Saturday-Sunday) and shows the defined pop-up message.
Step 3 - Create a day schedule
-
Open the day schedule configuration by pressing the New day schedule button.
-
Create a new day schedule (”On_holidays”) with the description "The time pattern valid only on holidays" and time pattern 08:00 to 12:00 in the first paragraph by defining the name and description via the respective buttons and by dragging the time bar in the week overview window.
-
Choose the same special day list with the ”Only on special days” mode.
-
Choose the validity period (e.g. 2003.01.01 00:00:00 to 2003.12.31 00:00:00) from the Time condition.
-
Configure a pop-up action for the desired user interface and create the needed DPE list that sets the heat and climate control values
-
Activate the schedule.
-
Save the new schedule.
Figure 4. Schedule for holidays 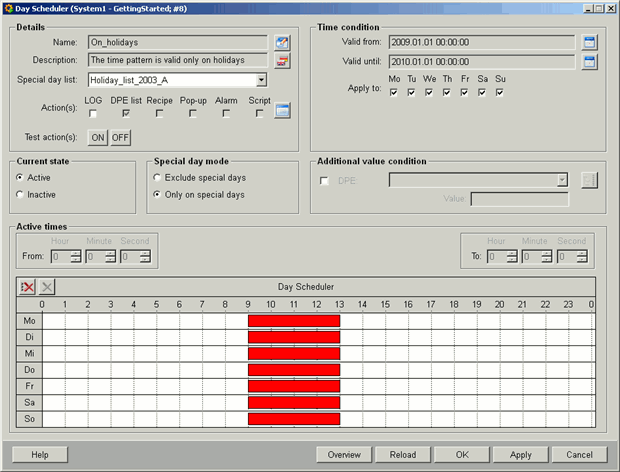
A day schedule was created. The created schedule sets the heat and climate control values only on the special days created in the step 1.
Example 2
Every 1st, 5th, 10th, 15th, 20th, 25th and 30th day of the month and only if these days are not Wednesdays, Saturdays or Sundays the position of all windows in an office building should be arranged in the same way to maintain the corporate identity of the company.
If the windows are already arranged optimal (windows datapoint == TRUE) the schedule should do nothing.
On holidays no action should be executed. This example shows you how to create a free schedule that sets the values of defined windows datapoints in order to arrange the windows of the office building in the same way.
Create a free schedule
-
Open the Free schedule configuration by pressing the New free schedule button.
-
Create a new free schedule (”Windows_arrangement”) with the description "To arrange the windows optimal" by defining the name and the description via the respective buttons.
-
Choose the special day list Holiday_list_2003_A with the ”exclude special days” mode.
-
Choose the Advanced mode from the Time condition and open the configuration panel by pressing the Advanced configuration button.
-
Enter a validity period in the advanced parameter settings window (e.g. 2003.01.01 00:00:00 to 2003.12.31 00:00:00) by pressing the
 button.
 -
Enter the days Monday, Tuesday, Thursday, Friday (1st, 5th, 10th, 15th, 20th, 25th and 30th day of the month).
Figure 5. Advanced configuration settings 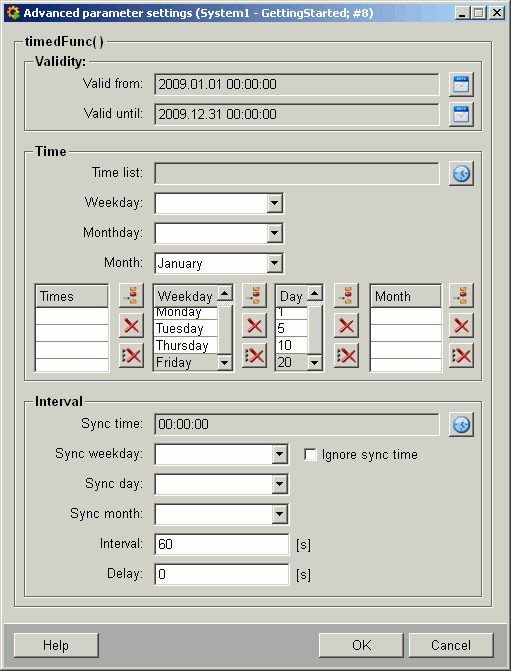
-
Press the OK button.
-
Configure the needed DPE list that contains the window position set values.
-
Create a windows datapoint of type BOOL via PARA.
-
Choose the created datapoint from the DPE combo box and configure the additional value condition on the windows datapoint.
-
Type the value FALSE in the text field.
-
Activate the schedule.
Figure 6. Windows arrangement solved as a free schedule 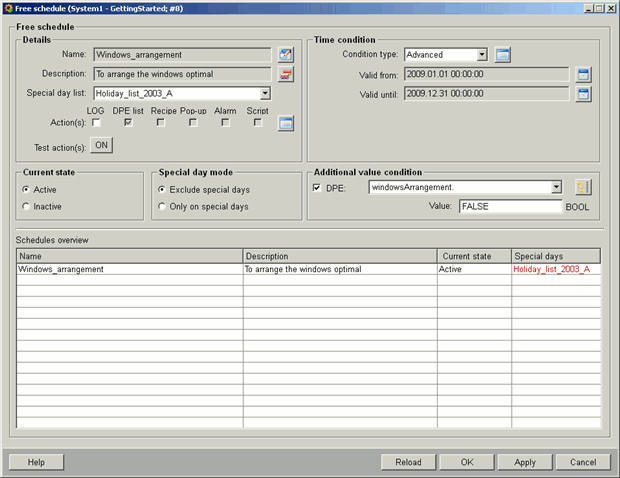
-
Save the created schedule.
A free schedule was created. The created schedule sets the values of the defined windows datapoints in order to arrange the windows of the office building in the same way. The values are set when the set time condition (1st, 5th, 10th, 15th, 20th, 25th and 30th and only if these days of the month are not Wednesdays, Saturdays or Sundays during the period 01.01- 31.12.2003) and the value condition (the windows datapoint of the Additional value condition gets the value FALSE) are fulfilled.
Example 3
The jalousies of the 2nd floor in an office building should be lowered every day at 15:30 for two hours because the evening sun but only if all windows are closed.
If not, all open windows should be closed before. On weekends no actions should be executed. The example contains the creation of a reaction program which checks if windows are open and closes the open windows of the building, a day schedule which triggers the created reaction program and a day schedule which lowers the jalousies at the specific time.
Step 1 - Create a reaction program
-
Open the reaction program configuration by pressing the New reaction program button.
-
Create a new reaction program (”Check_windows”).
-
Choose the window datapoint from the DPE1 combo box.
-
Choose the Condition type Single value.
-
Choose the Relational operator =.
-
Enter the value condition.
-
Configure the needed DPE that closes the windows if not closed already and sets the windows closed DPE on TRUE.
-
Activate the reaction program.
-
Save the created reaction program.
A reaction program which checks if windows are open and closes the open windows as well as sets the value of the windows datapoints on TRUE was created.
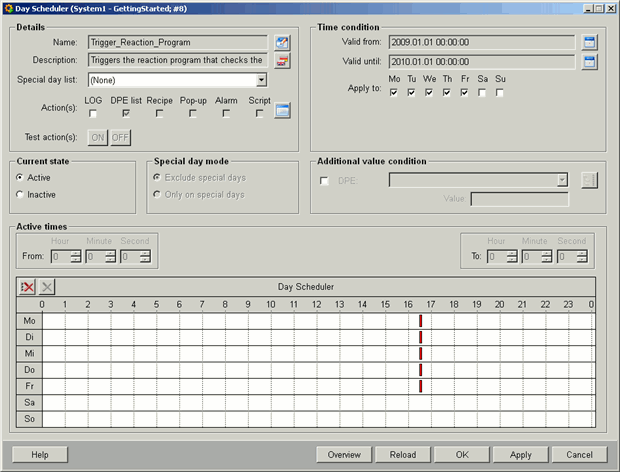
Step 2 - Create a day schedule
-
Open the day schedule configuration by pressing the New day schedule button.
-
Create a new day schedule (”Trigger_reaction_program”) with the description "Triggers the reaction program that checks the windows".
-
Enter a validity period (e.g. 2003.01.01 00:00:00 to 2003.12.31 00:00:00).
-
Enter the time 15:25-15:30 by dragging a time bar in the week overview.
-
Apply the time to Mo, Tu, We, Th and Fr.
-
Configure the needed DPE that activates and deactivates the reaction program.
-
Activate the schedule.
-
Save the created schedule.
A day schedule which activates the reaction program, that checks, if windows are opened and closes the opened windows, was created.
Step 3 - Create a day schedule
-
Create a new day schedule (”Adjust_jalousie”) with the description "Lowers the jalousies in the 2nd floor for 3 hours" and time pattern 15:30 to 18:30.
-
Choose the weekdays from Monday to Friday.
-
Enter a validity period (e.g. 2003.01.01 00:00:00 to 2003.12.31 00:00:00).
-
Configure the needed DPE list settings that lowers the jalousies at 15:30 and uppers them at 18:30.
-
Activate the schedule.
Figure 8. Adjust jalousies in the 2nd floor 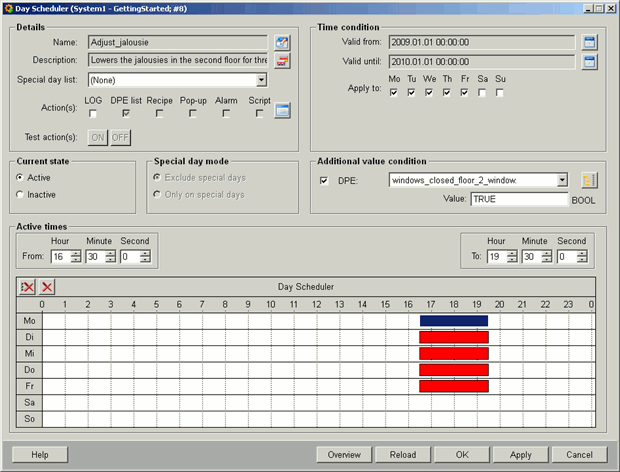
-
Save the schedule.
A day schedule which lowers the jalousies when the defined time- and datapoint (the window datapoint gets the value TRUE=windows are closed) conditions are fulfilled was created.