
Create project
Create a new project
Click on the push button New project in the Project Administrator panel to create a new project. Only an empty directory structure is created for a new project. Required files from the config / directory and the database from db/WinCC OA are used to create the new project. When registering projects (new created projects are registered automatically) project information such as the project name, the project directory, the version and the user are written to the pvssInst.conf file. Under Windows this file is located under C:\ProgramData\Siemens\WinCC_OA and under Linux the file is located under /etc/opt/wincc_oa. The path of the file can be overwritten via environment variable PVSS_II_ROOT (only for Linux). Since the version path is included in the file it is not necessary to set the environment variables.
The following notes and warnings must be considered when creating a new WinCC OA project:
Selecting project type
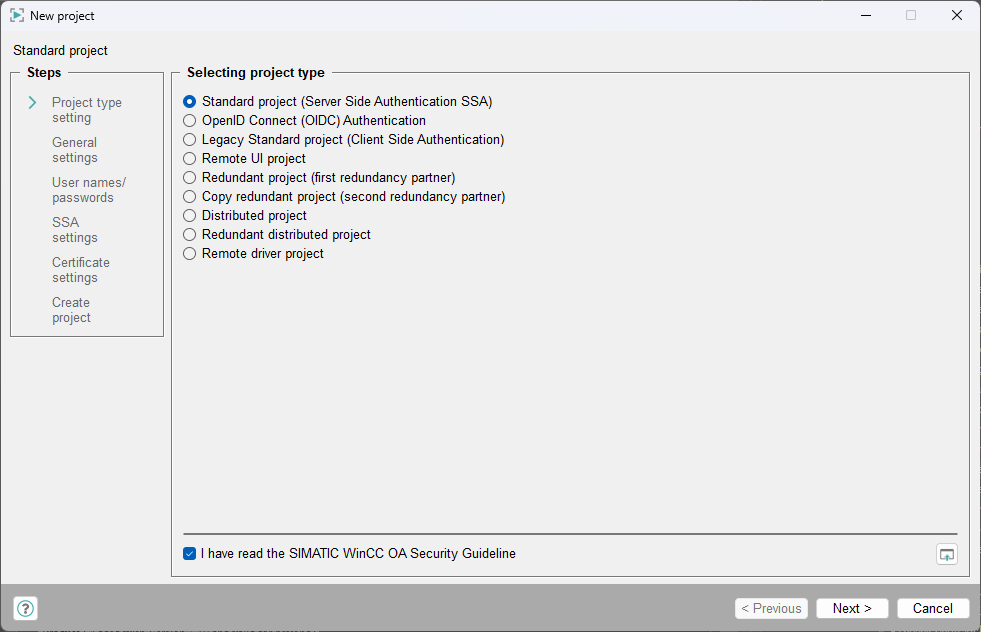
Choose the project type. You can choose between the following options:
- Standard Project: is a secure SSA project (SSA active by
default). Session Binding reduces the risk of manipulated messages and
unauthorised access to a system.
Communication security is increased as access by unauthorised managers is prevented.
With session binding, the user name is part of the certificate.
- OpenID Connect (OIDC) Project: A project using OpenID Connector for the user authentication within the user interfaces and SSA for other manager authentication. Creating a project that uses OIDC requires a WinCC OA JavaScript Manager for Node.js, therefore the setup component Environment for JavaScript must be installed as part of WinCC OA.
- Legacy Standard Project: A project without standard security features.
- Remote UI Project: Project with a remote user interface.
The remote project is linked to connected to a project on the server. The remote
project is created and started on the ‘client’.
A directory structure and a config file are automatically created on the client (copied from the server).
- Redundant Project: A configuration for a redundant project.
- Distributed Project: A configuration for a distributed project.
- Remote driver project: Remote driver project: The executable server project can be selected in the New project panel. I.e. the project is a remote project.
General Settings
- In the project name field you can give the new project a name.
Note:
Note that when defining the name of a project you may only use the 7-bit-ASCII character set. In addition, the name must not contain the following characters: / \ ? < > * | ; : " '. Note also that you cannot use an empty project name and the project name must not start or end with a space.
It is not allowed to use names that resemble version numbers,, e.g. "3.9" because these names lead to errors during the project creation.
- Select the a desired language:
You can also select several project languages. For more information please refer to create a new multilingual project.
Note:For historical reasons older panels and scripts are coded after ISO standard. Should these be opened and stored in a project using UTF-8 coding, special characters, for example German umlauts, are not displayed correctly. - Specify the project path (the target directory) either by
entering the path manually or by clicking on the push button with the folder
symbol. In the selected folder a new directory with the project name is created.
Only characters from 7-bit-ASCII character set may be used in the project path. Both forward and backward slash (/ and \) can only be used to separate the name of directories.
The following characters are not allowed in the project path, either:
- Umlaut ("ä","ö", "ü") - cause problems during online backup
- Dollar sign ($)
- At sign (@)
- Angle brackets (< >), brackets ([ ]) and braces ({ })
- Colon (:) and semicolon (;)
- Equal sign (=)
- Circumflex sign (^)
- Vertical bar (|)
- Asterisk (*)
- Exclamation mark (!)
- Percent sign (%)
- Question mark (?)
- Comma (,)
- Quote sign (single and double) (' ")
- Tabulator blank
- No unicode characters under Windows with RAIMA database or History DB (Value Archives).
The check box Runnable defines whether the project can be started. This means that all directories and files for proper operation have to exist. A sub project (e.g. info server) would not be executable alone. The directory .../db/wincc_oa/ in the directory structure as well as a config file (.../config/config) have to exist in order to run a project.
Use SQLite creates an SQLite project. For SQLite projects NextGen Archiver (NGA) is automatically used. For more information on SQLite, see chapter SQLite®.
Following combinations of database types are supported within WinCC OA:
-
RAIMA in combination with:
- History DBValue Archives
- RDB Archiving
- NextGen Archiver (NGA)
- SQLite® with NextGen Archiver (NGA)
Use NGA creates an NGA project. For more information, see chapter NextGen Archiver (NGA).
Archiving
The archiving options Use SQLite , Use NGA and PostgreSQL® Backend are preselected. The default port for PostgreSQL® is 15432. The following DB Backends are available: PostgreSQL®, InfluxDB® and Manual configuration. This option does not create a managed database.
Creating new project
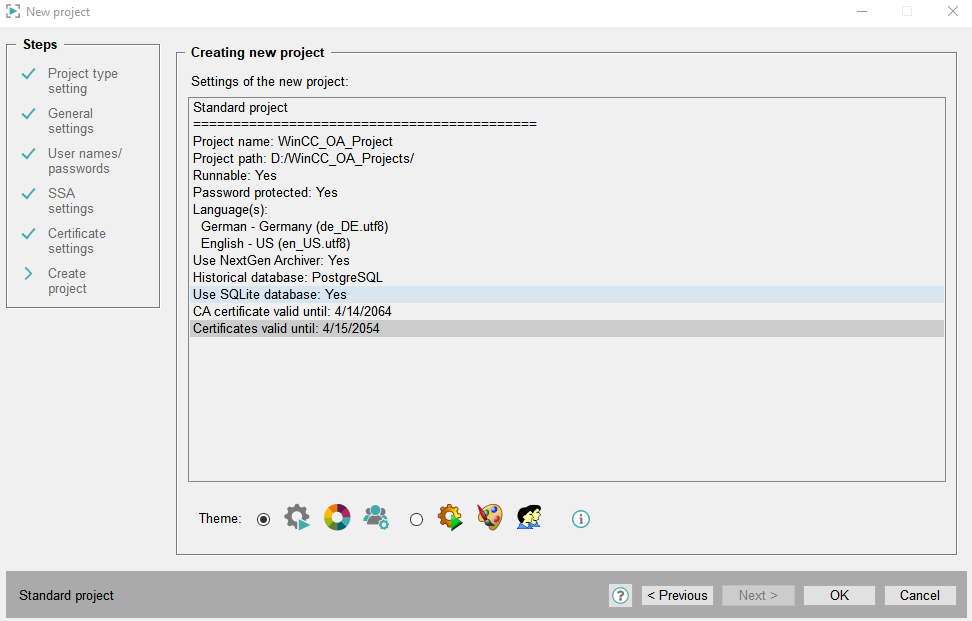
As the next step, you will be shown an overview of all selected options.
- This panels also shows the selection of the used Icon Theme for the project.
- After choosing an Icon Theme, click OK and your project will be generated.
No other settings can be created when the project is created. When the project is created the list of the projects is updated in the project administrator panel and the new created project is selected automatically.
After creating the project you can assign a user and a password to the project via the Change project properties panel in order to prevent an unauthorized access.