
Requirements and Configuration
Requirements
- Correctly installed WinCC OA version 3.7 or higher
- Kerberos infrastructure (is not part of WinCC OA); e.g. windows domain
- a working clock synchronization
- a working name resolution
- a valid license key for using Kerberos in WinCC OA is
required:
kerberos = 0/1
0 (default) = none , 1 = Kerberos authentication
Running kerberos with WinCC OA
A standard installation of WinCC OA version 3.7 or higher is necessary for the use of Kerberos based authentication.
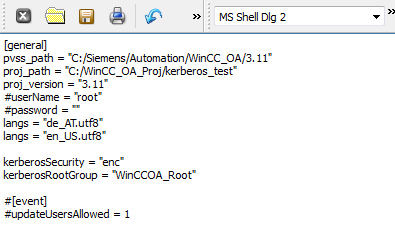
Add the config entry "kerberosSecurity" (specifies whether Kerberos should be used) to the config file (see chapter Config entries for more information). In addition to "kerberosSecurity" the config entry "kerberosRootGroup" is necessary.
Server Configuration
In order to use Kerberos proceed as follows:
Active Directory user groups
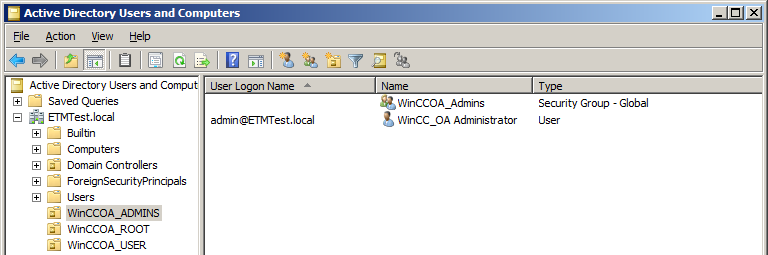
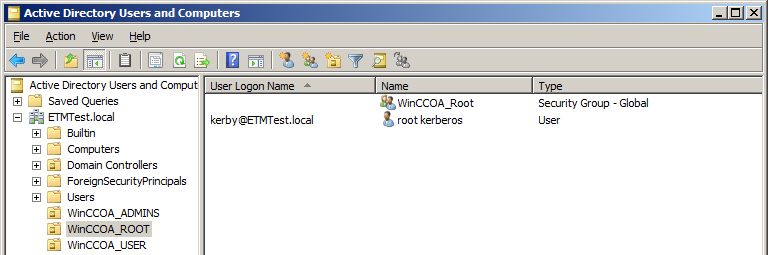
It's recommended to create three organizational units (OU) in the Active Directory (AD), for example WinCC_OA_ADMINS, WinCC_OA_ROOT and WinCC_OA_USER. User groups and user shall be assigned to these OUs according to their level of permission.
The group WinCC_OA_Admins as well as at least one user (e.g. WinCC_OA_Administrator) is created in the OU WinCC_OA_ADMINS. The same procedure applies to the other OUs.

Service Principal Names
You must configure a Service Principal Name (SPN) for using Kerberos. WinCC OA is using two SPN types: "PVSS/<fully qualified hostname for manager communication> and "HTTP" /<fully qualified hostname for browser communication>.
The PVSS SPN is reserved for the process monitor WCCILpmon which has to run on the specified host. The SPN must only be used for one computer (WinCC OA server). The <fully qualified hostname> is the host name including the domain. The name service must be able to resolve the names that are used for the SPN. If you use redundant LAN connections, the SPN must be created for all involved host names, e.g. PVSS/host-1.domain.com and PVSS/host-2.domain.com. The HTTP entry is required when running an HTTP server.
Add these addresses.

A SPN must exist for each user account in whose context the PMON service is running.
Under Linux, you must create the SPN by yourself. Enter the SPN of the server "PVSS/<fully qualified hostname for manager communication>" into the Kerberos database. Note that under Linux the SPN is case sensitive. For detailed information on how to install Kerberos under Linux see Installing and Configuration
An SPN must only exist once.
Under Windows you can use the "setspn" tool. It is part of the Microsoft Resource Toolkit. You need administrator rights to use this tool. Use these commands only if you are an experienced user.
setspn -l <name> : returns the defined SPN of the specified account. The account can be a user account or a machine account.
setspn -a PVSS/<host> <name>: adds the SPN PVSS/<fully qualified hostname> to the specified account. You can also specify a machine account (<HOST>$).
Note that the Service Principle Name is case sensitive. In WinCC OA it's necessary to enter the SPN with capital letters.
WinCC OA Configuration
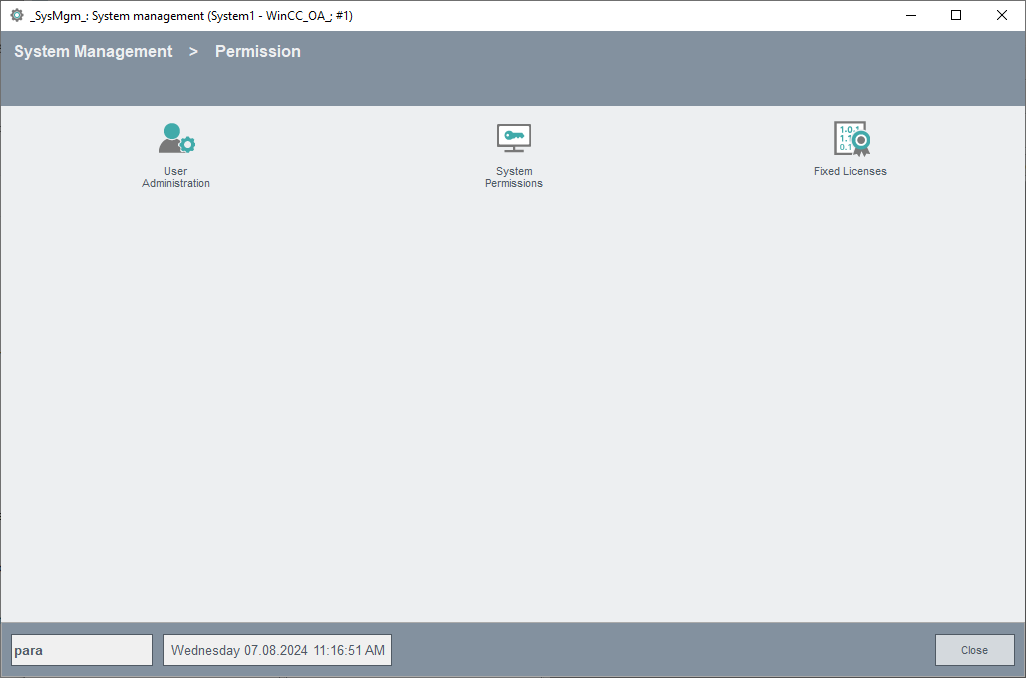
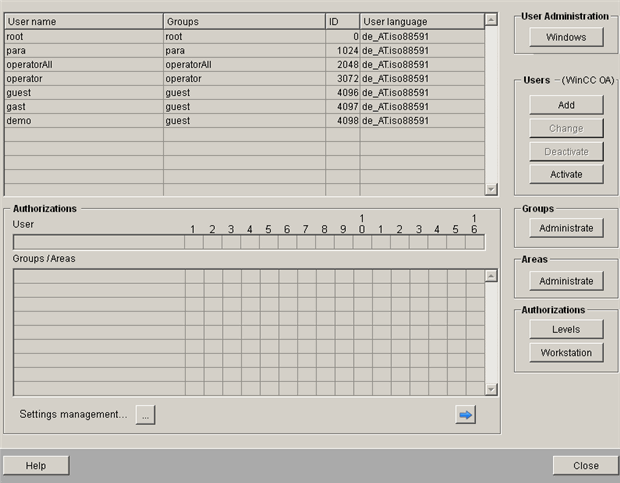
Open the WinCC OA User Administration via System Management -> Permission -> User Administration
Switch to the Windows User Administration as the current user by clicking the Windows User Administration button.
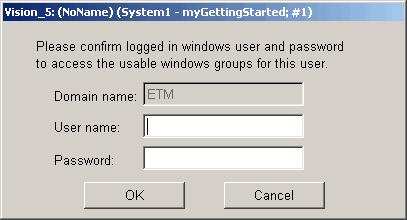
Enter the Windows password to switch to the Windows User Administration:
Note that when changing from WinCC OA user administration to Windows user administration, all WinCC OA users (except the ROOT user) will be deleted.
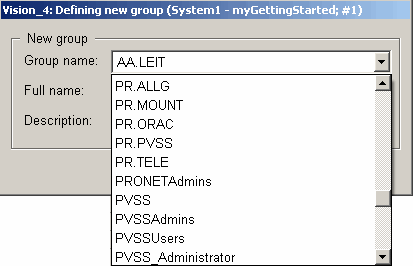
Add the WinCC OA relevant user groups to the Windows User Administration using the Group Administration panel. Note that when using Windows user administration, only the groups that are defined in the Windows user administration (e.g. Active Directory) can be added.
The Windows groups can be selected from a combo box that will be displayed when the Windows administration has been selected. A user must belong to at least one of the groups that were specified in the Active Directory.
Set the authorization bits for the groups by clicking the "..." button of the Group Administration panel. The members of a group inherit the group rights.
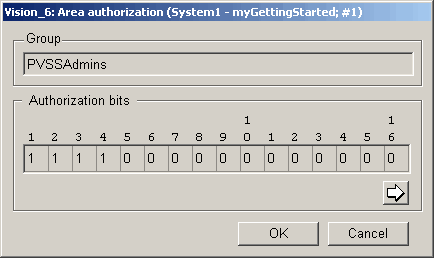
The group that's specified as kerberosRootGroup in the config file mustn't be adopted or provided with authorization bits.
At least one group must possess the first five authorization bits, otherwise you won't be able to administer WinCC OA after switching to Kerberos. Therefore, use e.g. the group WinCC_OA_Admins.
The default user in the config file must be removed.
The necessary steps for using secured authentication are completed.
Unauthorized connection attempts are saved in the PVSS_II.log file in the log directory.
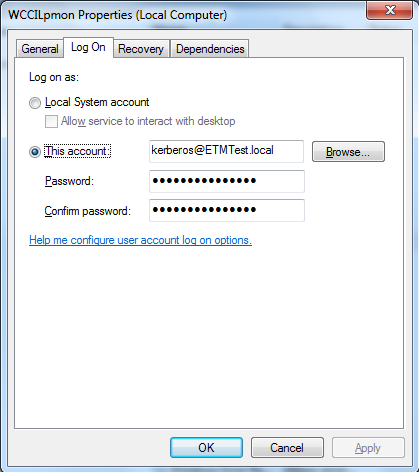
Start PMON as service
A project must be executed as a service for the use of kerberos authorization in WinCC OA. Therefore, the PMON must be specified as service in Windows. The PMON service must have enough rights, however it's recommended to limit the rights of the service to the least amount possible. The following list is sorted by the level of permission for access on windows.
- network service
- local service
- local system
- special user
The account in whose context the PMON is running as service must be member of the kerberosRootGroup. If the PMON uses one of the windows service accounts the machine account must be a member of this group.
When using the pmon as a service consider that only a defined user must be used to start the service. The local system account must not be used due to the fact that access and permission problems might occur.
Do not start the PMON service before all configuration steps are finished.
Starting the User Interface
Starting a User Interface on a server by the PMON service is only possible to a limited extent. Windows does not allow a complete access from a service to an interactive session due to security reasons.
Therefore, it is necessary to start a separate UI. It is possible to start either a UI project (remote UI on its own computer) with its own PMON or to start a local UI with an additional parameter that specifies the current project. E.g. you can create a link that adds the necessary parameter (see WCCOAui).
"WCCOAui -currentproj -m gedi"or
"WCCOAui -currentproj -p panel.pnl"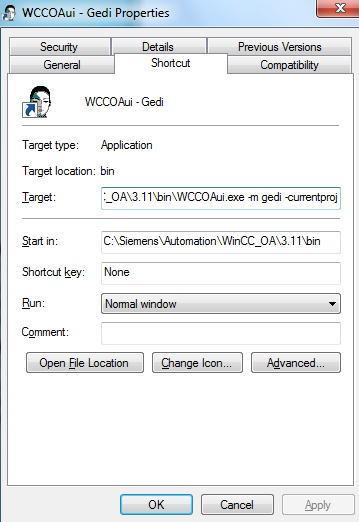
Users that are member of the kerberosRootGroup may not log into a WinCC OAUI if the -user root:<password> parameter was not specified. In order to avoid an accidental login of a WinCC OA user, a user of the kerberosRootGroup must not login to Windows either. If you login to WinCC OAas a user of the kerberosRootGroup to, contact the support.
Users of the kerberosRootGroup are only required for the internal use of WinCC OA (e.g. as service account for the PMON) and must not be implemented for the user account management of a project.
Checklist for starting Kerberos in WinCC OA
- Functional DNS / all IP addresses for WinCC OA can be resolved
- There is only a small date and time difference to the Domain Controller
- User management of the domain normally contains 3 groups and 3 users
- Admin group
- Kerberos root group
- Operator group
- One admin user, one kerberos root user, one operator user
- Change from WinCC OA to Windows User Administration
- Enter the authorization bits 1-5 for the admin group
- Set the rights for the users according to your needs (you can do this later as well)
- Create the SPN for all connections (choose a proper user)
- Stop the project
- Specify the PMON as service (choose the user from the SPN)
- Adapt the config file
- kerberosRootGroup
- kerberosSecurity
- Delete the default user and the password
- Start the project