Authorization Check Plug-in Wizard
Open the authorization check plug-in wizard via the System Management panel ->Permission tab.
The authorization check plug-in wizard consists of three tabs:
Note that the settings of the tabs are enabled (online) in the WinCC OA system right after configuration.
Lists
On the "List" tab you can grant or deny manager access by using white and black lists.
The "List" tab comprises the two areas: "Manager view" as well as "Whitelist/Blacklist".
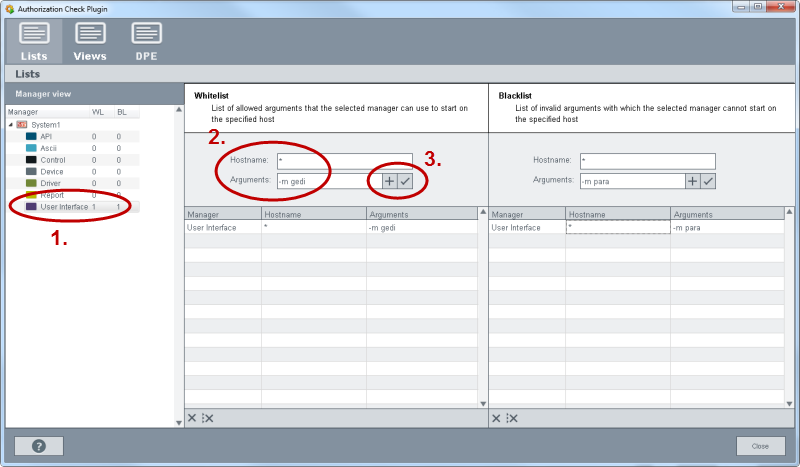
Manager View
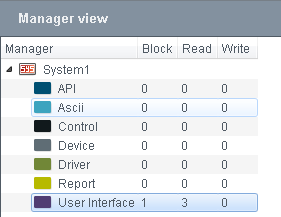
In the manager view you can see via the number of entries which limitations/permissions were added for the single managers of the manager view.
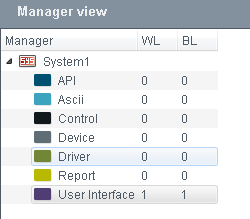
The manager view shows the total number of rights that were configured.
Whitelist/Blacklist
In order to add an entry (host name and arguments) to the white or blacklist of the
manager, select a manager from the manager view (Step1) and enter the host name and
permitted options for the manager (Step 2). Click on the „+“ button to add the
manager. To change an existing manager, click on the  button (Step 3).
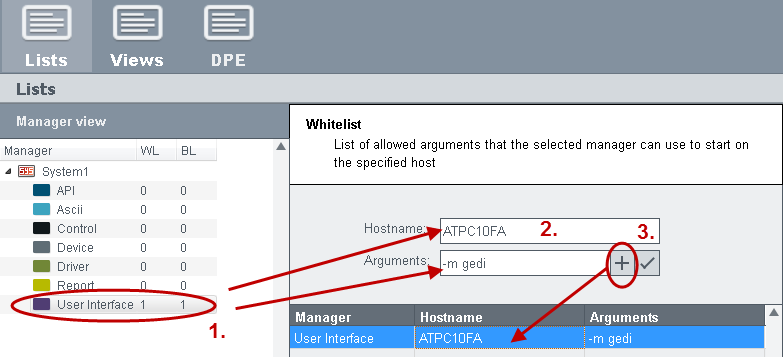
Hostname
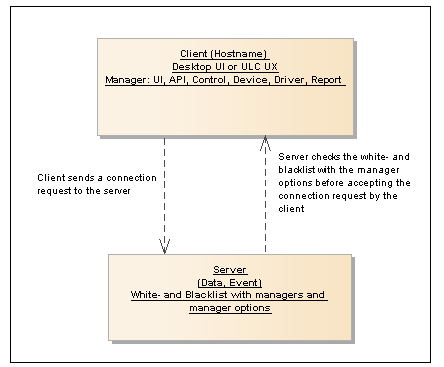
Enter here the host name of the client on which the WinCC OA managers have access (whitelist) or do not have access (blacklist). If a host name exists in both lists, the blacklist is used. Also the wildcard * (asterisk) can be used for all clients of a WinCC OA system. For each host select a manager from the manager view (Step 1). The authorization check plug-in is checked by using the combination of host name, manager and manager argument.
The white and black lists with the manager arguments are checked before the server (Data/Event manager) accepts the connection request by the client (manager on a specific host).
Arguments
Enter here the arguments for the specific manager. The arguments are permitted or denied when a manager is started. Manager options are checked before the server accepts the connection request of a client to the server. You can enter the manager options for single managers as arguments.
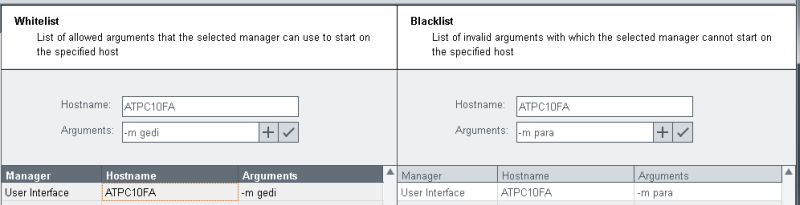
For white and black lists the specified arguments including the order of the arguments is checked.
If, e.g. the arguments "-num 4 -m para" are specified in the whitelist, the user interface cannot be started with the arguments "-m para -num 4".
You can find a detailed description of the manager options in the chapter Manager options, basics as well as in the advanced chapters such as WCCOAui.
In the figure below on the client "ATPC10FA" a user interface may only start the module GEDI but not the module PARA.
 Deletes a single manager (row) from
the whitelist/blacklist table after selecting it
Deletes a single manager (row) from
the whitelist/blacklist table after selecting it
 Deletes all managers from the
whitelist/blacklist table.
Deletes all managers from the
whitelist/blacklist table.
Views
Views
The authorization check plug-in is based on the settings that are saved in the plant model of a plant. Before using the authorization check plug-in, a plant model must be created and entered into the plant model editor.
To illustrate this, a simple model is used in the further examples.
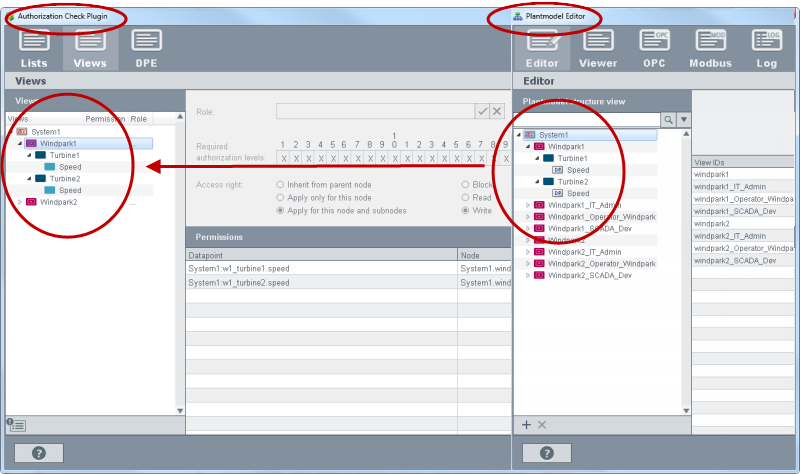
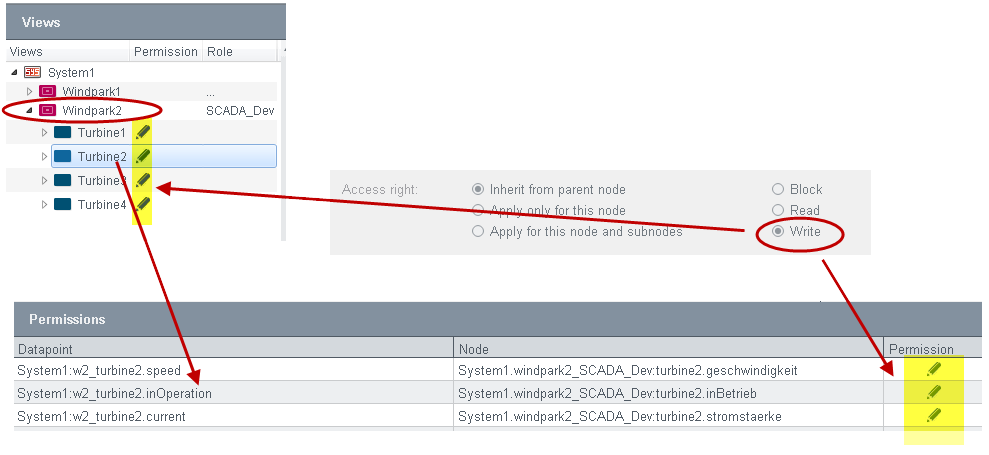
The view "Windpark1" contains the nodes Turbine1 and Turbine2 and the both turbines again the node "Speed".
A view must be created in the plant model editor, This view is then shown in the plug-in.
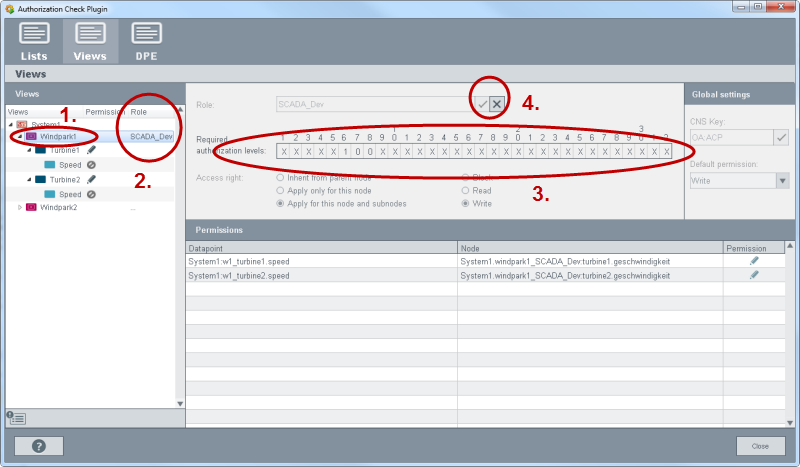
On the "Views" tab you can see the plant model specific views. Rights are assigned for every view. A user must possess the rights. Datapoint rights are assigned to a role and the role to a view. In so doing you specify how a user can display and read data points as well as write on them.
The "Views" tab comprises the following areas: Views, Role, Required authorization levels, Access right, Permissions as well as Global settings.
Select the view from the views (step 1). and assign a role to the view (step 2). Set the authorization bits that enable the access as well as the access right for view and role (step 3). Save the configuration for the view (Step 4).
Authorization
Next to node name also the permission for the node is shown - see description of the permission.
Roles
Create roles via the "..." column and the "New role" option.  .
.
In the figure above, the role "SCADA_Dev" was assigned to the view "Windpark1". The role "SCADA_Dev" has write rights for the datapoints: "windpark1_SCADA_Dev:turbine1.geschwindigkeit" and "windpark1_SCADA_DEV:turbine2.geschwindigkeit". The datapoint rights are assigned to a role.
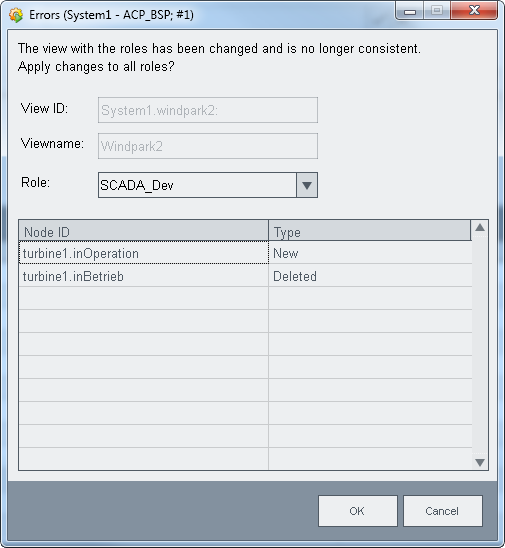
When e.g. a node name is changed in the plant model editor, a message is shown in the authorization check plug-in Wizard.
 With this button you can check roles for
errors and then change them. All entries in Authorization Check Plug-in Wizard are
checked for inconsistent changes:
With this button you can check roles for
errors and then change them. All entries in Authorization Check Plug-in Wizard are
checked for inconsistent changes:
-
Plant model views: a node was deleted or a new node was added.
-
A datapoint connection was changed.
-
That a node was renamed is shown as an error "Node was deleted and a new was created".
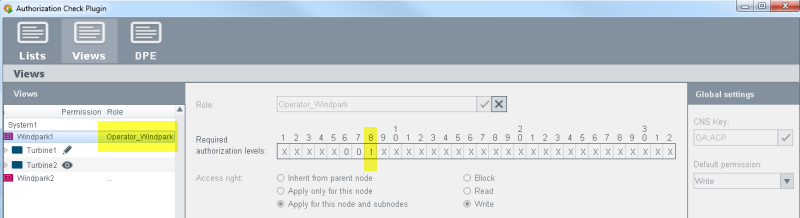
Required authorization level
The authorization levels in views are set via bit patterns of user bits for a view. For a detailed description of the bits, see chapter authorization levels. Set the user bits for a view. The user bits are then also valid for the nodes of a view. The view must be selected in order to set the bits. Possible values in the bit mask are 1, 0, or X. With 1 the bit is set (the user must have the authorization bit) and with 0 the bit is deleted (the user may not have the bit). X means that the bit is not checked (Don’t Care).
The authorization levels set here are compared with the authorization levels of a user group. If a group and via the group a user possesses the same WinCC OA bit pattern as the view, the user has the access right to the datapoints. The example demonstrates the use of the authorization levels (user bits).
This bit was assigned to a view via the wizard:
User Andreas has in WinCC OA the bits: 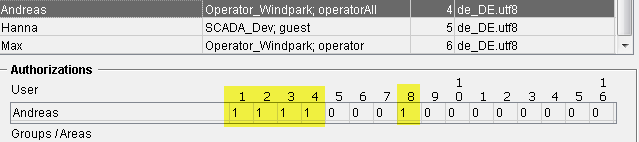
User Hanna has in WinCC OA the bits:

User Max has in WinCC OA the bits:

The users Andreas and Max possess the same bit pattern as the view but the user Hanna does not possess it. This means that the user Andreas and Max have the access to this view and for the nodes and datapoints of the view.
Set required authorization level (Bits) for the view
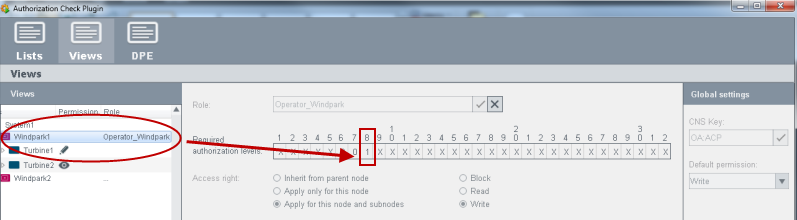
The role "Operator_Windpark" has the user bit 8.
Access right
-
Adopt of node above - the access right is adopted from the node above. CAUTION: if there is no "parent" node, no authorization is set (the authorization is "deleted").
-
Adopt only for this node - the access right specified here is only valid for this node
-
Use for this node and sub node - the access right specified here is valid for this node and all sub nodes
-
Block: the datapoints are not shown to the user
-
Read: defines whether a node is readable
-
Write: defines whether the node is writable
Different access rights can be set for the same datapoint e.g. once read access and once write access. This way different access rights can be assigned to the same data point via different nodes of a view. When different access rights are defined, all rights are checked. The higher right has priority.
| Access right | Processing order |
|---|---|
| Block | 0 |
| Read | 1 |
| Write | 2 |
If, for example, the datapoint "speed" was assigned to node "Turbine1" with read access and to node "Turbine2" with write access, the higher access right "Write" has priority (Processing order 2).
Permissions
Under "Permissions" all nodes and datapoints of the view are shown after clicking the view. In the "Permission" column the access right for this datapoint is shown - see desciption of the access right.

Global settings
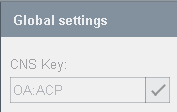
CNS Key
Under this key all rights of the authorization check plug-in are saved. Example: the key „OA:ACP“ was configured. The authorization information is saved under this key. The key may only be specified once. The default value is OA:ACP.
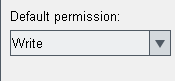
Default permission
In the column default permission the default permission is set for all datapoints. The default permission is valid for all DPE that are not assigned to a plant model node on the "Views" tab and are not included in the public datapoint list (on the DPE tab).
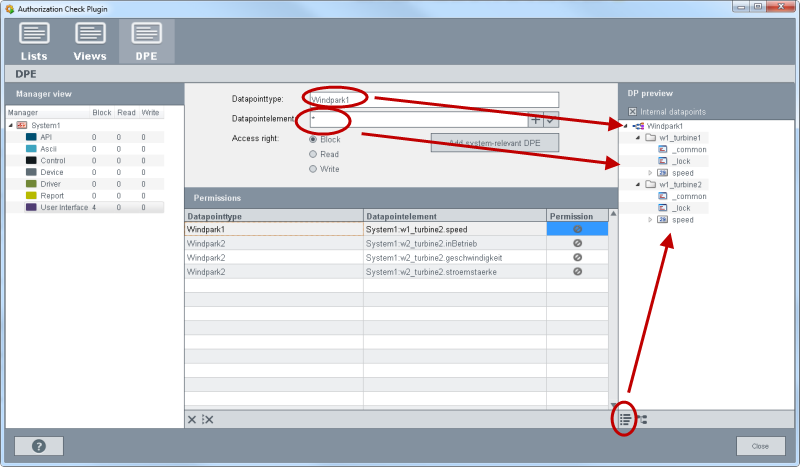
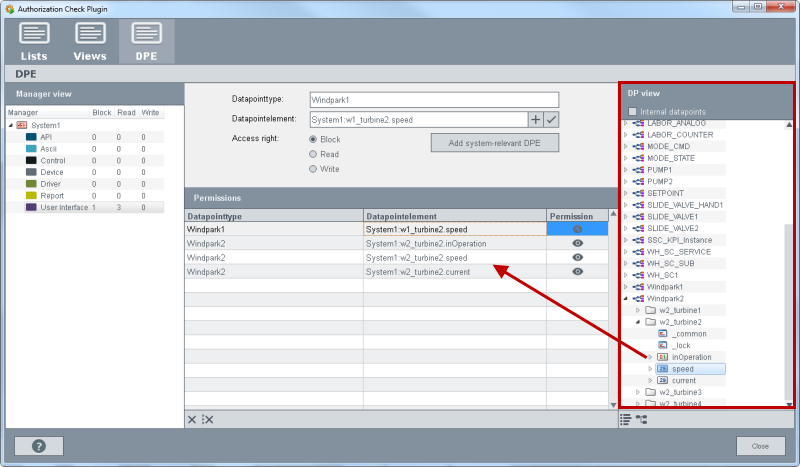
DPE
On the "DPE" tab global rights for datapoints for managers can be set. These rights are valid for the whole WinCC OA Project irrespective of the user.
The DPE tab comprises the following areas: Manager view, Datapointtype/Datapointelement, Access right, Permissions and DP View/DP Preview.
Select a manager from the manager view (Step 1). Add a datapoint via Drag & Drop in to the field "Datapointelement" or the datapoint type in the field of the same name (steps 2 and 3). You can also drag a datapoint via drag&drop into the table (see figure below). Set the access right for the datapoints (step 4) and save the configuration (step 5). You can find the descriptions of the single fields further below.
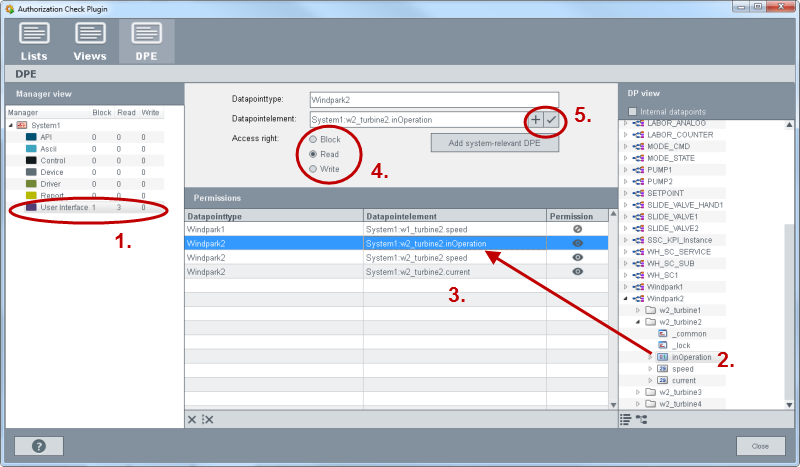
Manager View
Select a manager from the manager view. The access rights are set for the selected manager.
Datapoint type/ Datapoint element
You can configure the access to specific datapoints via the field "datapoint type" or "datapoint element". Thereby the wildcard * can be used for datapoint elements.
Access right
The following access rights can be set for the managers globally. The rights are valid for the whole project irrespective of the user.
-
-
Block: the datapoints are not shown to the user
-
Read: defines whether a node is readable
-
Write: defines whether the node is writable
-
Add system-relevant DPE
Adds the datapoint elements that are relevant for the operation of WinCC OA, to the "Permissions" table below.
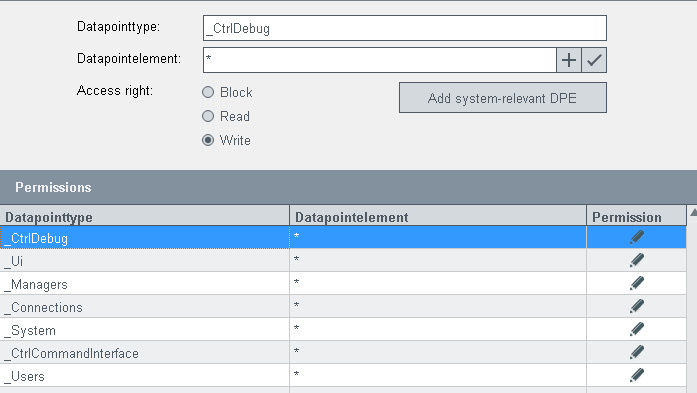
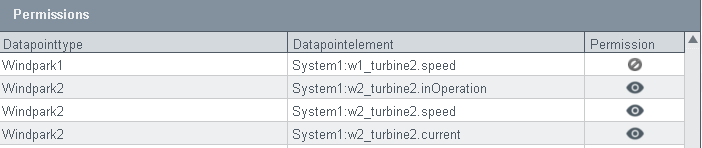
Permissions
Under permissions the configured datapoint types and datapoints as well as the access right (block, read, write) are shown.
DP View/ Preview
From the DP view you can select datapoint types and datapoints via Drag&Drop.
DP preview
The  button shows which datapoints are
selected by using wildcards. The figure below demonstrates the datapoint preview.
Select the datapoint types and datapoints via Drag & Drop (Step 1) and view
the datapoints via the button (step
2).
button shows which datapoints are
selected by using wildcards. The figure below demonstrates the datapoint preview.
Select the datapoint types and datapoints via Drag & Drop (Step 1) and view
the datapoints via the button (step
2).
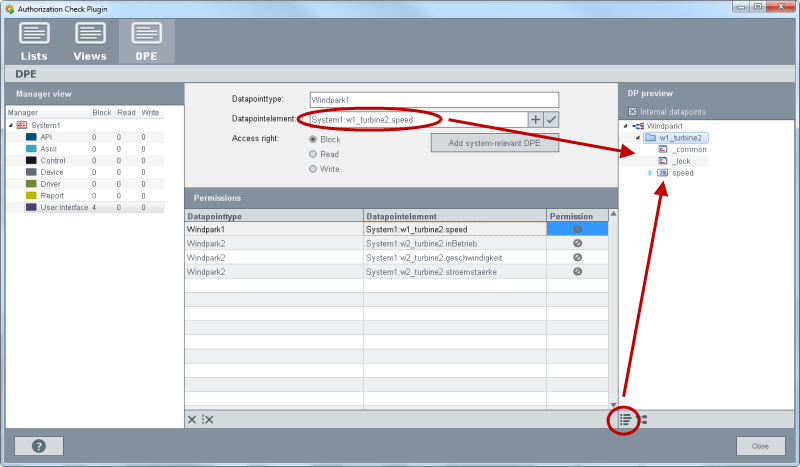
The datapoint on the selected row is shown via the button. When you use the asterisk (*) for the datapointelement field, all datapoint elements of the specific data point type are shown (not only the datapoint elements that were selected via drag&drop but all datapoint elements of the specific type).