SMS demo panels
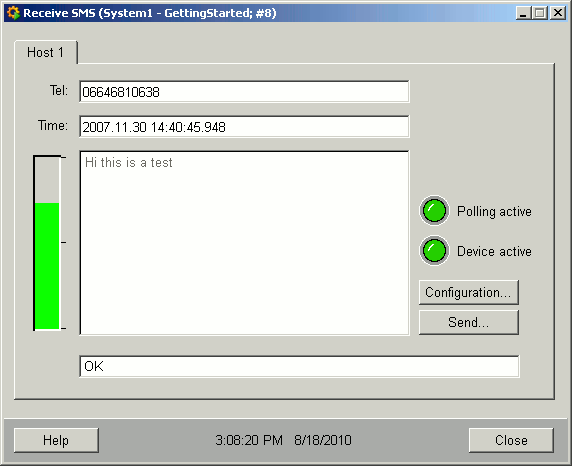
The following chapter demonstrates the SMS demo panels for receiving and sending of SMS messages. The panels are described in the following:

The Receive SMS panel comprises the following elements:
-
Polling active display. The Polling active lights up when data is transferred from/to cell phone or modem. If the automatic request of received SMS messages runs, it lights up every 10 seconds resp. when messages are sent or settings configured.
-
Device active display lights up when a connection to the cell phone exists.
-
Received SMS with the phone number of the sender, time of the SMSC (Short Message Service Center) and the message text. You can see the phone number of the sender and the send time in respective text fields Tel and Time.
-
Current time. Current time is shown in the upper right corner of the panel.
-
Reception quality bar shows the reception quality like it is shown in a cell phone.
-
The status display in the bottom of the panel shows the country-specific status in case of errors (like wrong PIN code, wrong SMSC etc.).
-
Buttons: Configuration... opens the configuration panel. The configuration panel was described in detail in the chapter SMS Configuration, Send SMS..., Close (Closes the panel), Help (Opens the Help).
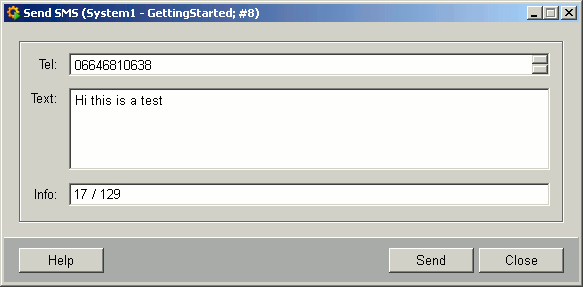
The Send SMS... button opens the Send SMS panel:

The Send SMS panel includes the text fields:
-
Tel: Define the phone number of the recipient. Note that you have to type the telephone number of the recipient in international format e.g. 43676... for Austria. Note also that the phone number has to be given without blanks.
Dependent on the used end device it may be possible that you have to enter the phone number in this panel with a "+" (e.g. +43676...)!
-
Text: Define the text you want to send. The maximum length of a message is limited to 128 characters!
If a SMS is sent via utf8 project, the € symbol is not displayed when it is written at the end of the message. Insert an blank after the € symbol in order to avoid this.
-
Info: Shows the maximum amount of characters you can use and how many characters you have already used for your message.
as well as the button Send that sends the message.
